

table of contents
This guide is written for civilian preparedness — no prior medical training assumed. Operational personnel should cross-reference with their unit’s current SOP and verified training cadre.
In every hands-on tourniquet class I teach, the same error shows up reliably: people stop twisting the windlass too early. Not because they haven’t read that it needs to be tight — they have. But under the pressure of a simulated scenario, they stop at “uncomfortable” instead of “no distal pulse.” That gap — between knowing the standard and executing it under stress — is what ends otherwise correct applications.
Uncontrolled limb hemorrhage can be fatal in under five minutes. The Combat Application Tourniquet — the CAT — was designed for exactly that window: fast enough to apply under stress, reliable enough to trust when everything else has gone wrong. Procurement teams comparing training stock, cartons, and OEM packaging can review our CAT tourniquet bulk supplier page before building a restock list. But the device only works as well as the person applying it.
This guide covers the full application sequence in the order you actually do it, including the one-handed self-application technique, the placement rules most often misunderstood, and the mistakes that most consistently cause applications to fall short. The steps follow TCCC (Tactical Combat Casualty Care) guidelines as updated in January 2024.
Quick Reference — 8 steps to apply a CAT tourniquet:
- Expose the limb — cut or remove clothing above the wound.
- Position — route the band 2–3 inches above the wound, directly on skin.
- Thread and pull — pass the strap through the buckle and pull very tight by hand.
- Secure the band — fold it back on itself and fasten the hook-and-loop.
- Twist the windlass — rotate until all bright-red bleeding stops and distal pulse is gone.
- Lock the windlass — clip it into the retention clip so it cannot unwind.
- Secure the strap — wrap the windlass strap over the locked rod.
- Write the time — mark hour and minute of application on the white time strip.
When to Use a CAT Tourniquet
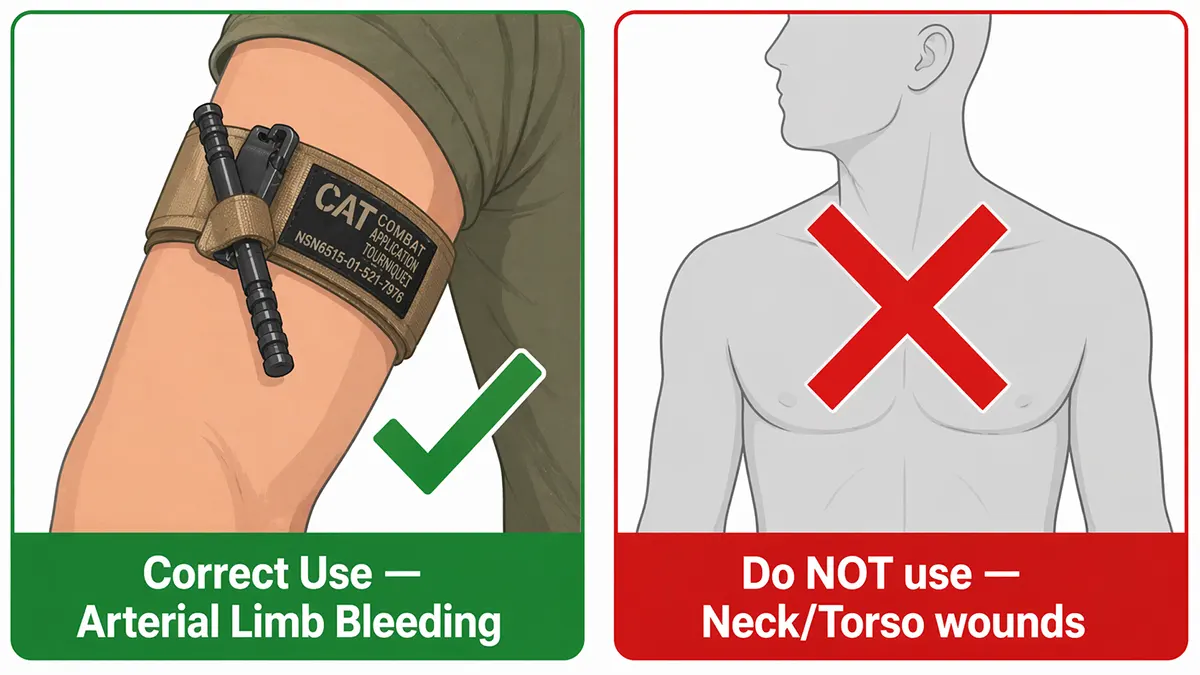
A tourniquet is appropriate for one specific situation: life-threatening bleeding from an arm or leg that cannot be controlled with direct pressure. The visual threshold is clear — if blood is pooling on the ground rapidly, or the person is showing early signs of shock (pale, cold skin, rapid shallow breathing, confusion), apply the tourniquet immediately. Do not wait to see how bad it gets.
The CAT cannot be used on the neck, torso, or groin. For wounds in those areas, wound packing with hemostatic gauze is the correct intervention. For procurement teams choosing a gauze identity rather than a tourniquet, see our Combat Gauze vs QuikClot comparison.
| Use a tourniquet | Do NOT use a tourniquet |
|---|---|
| Arterial bleeding (bright red, spurting or pulsing) | Neck, torso, or groin wounds — use wound packing instead |
| Blood pooling rapidly on the ground | Minor cuts controlled with direct pressure |
| Signs of shock: pale skin, rapid breathing, confusion | Wounds at the knee or elbow joint — place above the joint |
| Traumatic amputation of an arm or leg | Venous bleeding (dark red, steady flow) that responds to pressure |
Know Your Equipment Before You Need It
The CAT has five components you need to locate by feel — not sight — because you may be applying it in the dark, under stress, or with one hand. Spend thirty seconds with a training unit finding each part before you read the steps. That tactile familiarity is not optional; it is what survives adrenaline.
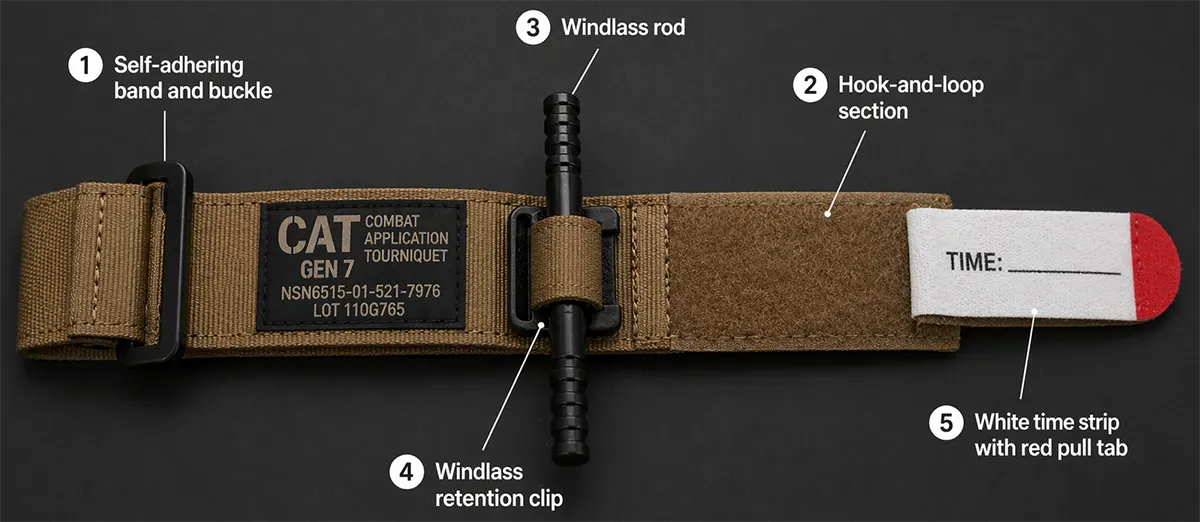
- Self-adhering band and buckle — the strap that wraps around the limb and threads through the single routing buckle
- Hook-and-loop (Velcro) section — fastens the band back on itself after initial hand-tightening
- Windlass rod — the rigid polymer rod you rotate to generate occlusion pressure
- Windlass clip — the retention clip that locks the rod once tightened; must engage with an audible click
- Time strip — the white writeable strap that secures the locked windlass and records application time On a Gen 7 CAT, the red tip at the end of the strap is a pull tab — lifting it gives you a grip point for the initial threading step, especially useful when wearing gloves.
Two-Handed Application (Assisting Another Person)
Use this method when you are applying the tourniquet to someone else, or to your own leg with both hands available. It is faster than the one-handed method and allows firmer initial tightening before you touch the windlass.
Step 1: Expose the limb — Cut or remove clothing above the wound site. The CAT must be applied directly to skin — application over thick fabric reduces effectiveness by 20–40% because the fabric absorbs pressure. In a true emergency, apply over clothing as high on the limb as possible first, then cut clothing away as soon as tactically feasible.
Step 2: Position 2–3 inches above the wound — Route the band around the limb and position it 2–3 inches (5–7 cm) above the wound, between the wound and the body. Never place the CAT directly on a wound or over a joint. If the wound is at or near the knee or elbow, place the tourniquet above the joint on the long bone — the device needs firm bone under it to generate occlusion pressure.
Step 3: Thread and pull the strap tight by hand — Pass the free end of the strap through the slit in the buckle. Pull it firmly until the band is snug against the limb with no slack. This step matters more than most people realize — the windlass can only rotate a finite number of times, so every fraction of slack you remove by hand is one rotation of windlass travel you retain as reserve. Pull hard before you touch the rod.
Step 4: Secure the band back on itself — Fold the free end of the strap back onto the hook-and-loop section and press it firmly. Quick check: if you can slide three fingertips between the band and the limb, it is not tight enough. Re-route and pull again before moving to the windlass.
Step 5: Twist the windlass until bleeding stops — Grip the windlass rod and rotate it. Keep rotating until bright-red bleeding has completely stopped AND you can no longer feel a pulse below the tourniquet (the distal pulse — at the wrist for arm tourniquets, at the ankle for leg tourniquets). Discomfort in a conscious patient is expected and correct. Stopping before bleeding has fully ceased is the most common reason CAT applications fail — and in a real emergency, falling short here has only one outcome.
Step 6: Lock the windlass rod in the clip — Press the rod down into the adjacent retention clip. You should hear and feel a distinct click. If the clip does not fully engage, the windlass can rotate back under pressure during movement — losing the occlusion you just worked to achieve. Confirm the click before moving on.
Step 7: Secure with the windlass strap — Route the windlass strap over the locked rod, under the clip, and around the limb. For smaller limbs, you may have strap remaining — continue wrapping around the windlass and clip rather than letting it hang loose. Pull the strap tight and press the hook-and-loop firmly.
Step 8: Write the application time — Write the hour and minute of application directly on the white time strip using a permanent marker or pen. If no marker is available, write on the person’s forehead or tape it to their chest — this is the TCCC standard. Write “TQ” plus the time. Surgeons and trauma teams need this information to assess conversion safety.
Check before moving on: bleeding stopped · no distal pulse · windlass locked · strap secured · time written. All five must be confirmed. If bleeding persists: add a second CAT side-by-side, proximal to the first. Do not remove or loosen the original.
One-Handed Application (Self-Application to the Arm)
The CAT was specifically designed and tested for one-handed self-application to the upper arm. This is the scenario where most civilian users underestimate the technique differences. Pre-staging the tourniquet in a closed loop before you need it — strap already threaded through the buckle — makes this significantly faster under stress.
Step 1: Insert your arm through the pre-formed loop — Slide your injured arm through the loop from the fingertip end. The loop must already be formed before the emergency — this is why pre-staging matters. If the strap is not pre-threaded, you will need to route it one-handed, which is possible but significantly slower.
Step 2: Position high on the upper arm — Place the tourniquet as high as possible on the upper arm, near the armpit. “High and tight” is the correct default for self-application — you are working one-handed under stress and may not be able to precisely assess wound location. High placement is the safe choice.
Step 3: Pull the strap tight — by hand or teeth — Pull the free end of the strap using your uninjured hand. If your mouth is the only option, thread the strap through the buckle and pull with your teeth — this technique is documented and effective. The goal is the same: band snug against skin before you touch the windlass.
Step 4: Secure the band — Press the free end back onto the hook-and-loop section. One-handed, this requires pressing the Velcro against your thigh or another firm surface to get adequate adhesion.
Steps 5–8: Windlass, lock, strap, time — identical to the two-handed method. Twist until bleeding stops and you feel no distal pulse. Lock the rod. Secure the strap. Mark the time. The tourniquet will feel like it is cutting off circulation. It is — and that is correct.
The Mistake That Fails the Most Applications
A 2025 study of civilian tourniquet applications found that 77% were applied incorrectly or in situations where a tourniquet was not indicated. When you trace those errors back to their root cause, one shows up far more than the others.
Error 1 — Stopping the windlass too soon (the most consequential error by a significant margin)
This error shows up in trained personnel as often as in untrained bystanders. The benchmark is not “it feels tight enough” — it is that bleeding has completely stopped and there is no distal pulse. If the wound is still seeping, keep twisting. A correctly applied CAT will cause significant pain in a conscious patient. That pain is the correct result. Stopping because it feels like enough is not stopping at the right place.
The other three errors
Error 2 — Placing it over a joint. A tourniquet on the knee or elbow cannot generate occlusion pressure because the joint angle prevents circumferential compression. Place it above the joint on the straight section of the limb — lower thigh for knee-area wounds, upper arm for elbow-area wounds.
Error 3 — Skipping initial hand-tightening. Threading the strap and going straight to the windlass leaves too much slack. The windlass has a finite rotation range. Every fraction of slack you do not remove by hand is windlass travel you cannot recover. Pull the strap as tight as possible by hand before you touch the rod.
Error 4 — Leaving tourniquet over clothing when time permits. Applying over clothing in the immediate moment is acceptable — it buys time. But cut the clothing away and reassess as soon as feasible. TCCC standard for the Tactical Field Care phase is tourniquet applied directly to skin, 2–3 inches above the wound. Treat an over-clothing application as temporary pending reassessment.
Time Limits and What Happens Next
Once a tourniquet is applied, do not loosen or remove it yourself. That decision belongs to trained medical personnel with the equipment to manage what follows.
That decision also has a destination: under TCCC the tourniquet is converted to a pressure dressing, which only works if one is actually in the kit. The three conversion criteria, and what a kit needs to satisfy them, are in Israeli bandage vs tourniquet.
TCCC guidelines establish a three-tier framework based on current evidence:
- Under 2 hours: the safe conversion window; this is the target for evacuation to surgical care
- 2 to 6 hours: considered manageable but must be evaluated only by medical personnel
- Beyond 6 hours: without clinical monitoring, significant risk of prolonged tourniquet application syndrome — rhabdomyolysis, acute kidney injury, and in severe cases limb loss
The two-hour target comes from Gulf War and Afghanistan experience, where aeromedical evacuation typically reached surgical care within 60–90 minutes. More recent data from the Ukraine conflict — where evacuation times can exceed 12 hours — has reinforced how critical accurate time documentation is. Writing down the application time is not a bureaucratic step. It is clinical information that directly affects what surgeons can safely do.
Never loosen a tourniquet to “check” the wound. Re-bleeding from a loosened tourniquet — particularly with arterial injury — can be fatal within minutes. Only qualified medical personnel should reassess tourniquet necessity.
Why Regular Practice Is the Actual Variable
Reading this guide is not the same as being ready to apply a CAT under stress. Fine motor skills degrade under adrenaline, in cold temperatures, with gloves, in darkness. The threading step — passing the strap through the buckle — is consistently the one most affected. People who have done it fifty times in training complete it in three seconds. People who have read about it complete it in thirty, when everything is going wrong around them.
The standard recommendation for operational personnel is one proficiency repetition per month with a dedicated training tourniquet (blue). For civilian preparedness, the minimum meaningful benchmark is this: complete the full application sequence — on yourself, one-handed, in under 60 seconds, without looking at instructions. Until you can do that, the knowledge in this guide is theoretical.
Keep training and deployable units separate. A training tourniquet that has been applied and released multiple times should not return to a carry kit as a deployable device. Mark it clearly and keep it physically separated from your deployment kit.
Frequently Asked Questions
Where exactly should a CAT tourniquet be placed?
2–3 inches (5–7 cm) above the wound on the same limb, between the wound and the torso. Apply directly to skin when possible. Never on a wound, never over a joint. For wounds near or below the knee or elbow, place it above the joint. When wound location is unclear — darkness, heavy clothing, active scenario — place it as high as possible on the upper arm or thigh. High and wrong is recoverable. Too low often is not.
How tight should a CAT tourniquet be?
Tight enough that bleeding has completely stopped and there is no distal pulse below the tourniquet. Three fingertips sliding under the band means it is not tight enough. A correctly applied CAT is painful for a conscious patient — that is expected and correct. The tourniquet should feel like it is cutting off circulation, because it is.
Can you apply a CAT tourniquet with one hand to your own arm?
Yes — it was specifically designed and tested for this. Pre-staging in a closed loop (strap already threaded through the buckle) makes one-handed application significantly faster. The key difference from two-handed application is that you slide your arm through the pre-formed loop rather than routing the strap by hand under pressure.
What if bleeding does not stop after applying the CAT?
First, tighten the windlass further — insufficient tightness is the most common cause. If maximum windlass rotation has been reached and bleeding persists, apply a second CAT side-by-side directly proximal (closer to the body) to the first. Do not remove or loosen the original. Document both application times.
How long can a CAT tourniquet stay on?
Target conversion or evacuation to surgical care within two hours. Functional outcomes are generally good up to four hours in healthy adults. Beyond six hours without clinical monitoring, the risk of prolonged tourniquet application syndrome — permanent muscle damage, kidney injury, and in severe cases amputation — increases significantly. This is why the time of application must always be written down immediately, every time.
Can a CAT tourniquet be reused after a real application?
CAT tourniquets are rated as single-use medical devices. Once applied under true occlusion pressure in a real emergency, the device should not return to a deployable carry kit. It can be retained as a dedicated training unit — clearly marked as such — if no visible damage is present.
References
Committee on Tactical Combat Casualty Care (CoTCCC), “TCCC Guidelines for Medical Personnel,” January 2024. deployedmedicine.com
North American Rescue, CAT Combat Application Tourniquet — Official Instructions for Use (RAW-29260-REV01). narescue.com
U.S. Army Institute of Surgical Research, 100% blood flow occlusion testing results for CAT tourniquet. Referenced via narescue.com
Weinrauch, P. (Australian Army), “How to Fold a CAT Gen 7 Tourniquet,” The Cove — Australian Army Professional Military Education. cove.army.gov.au, April 2025
Joint Trauma System, “Save Lives: Learn When and How to Properly Use Tourniquets,” jts.health.mil, February 2025
Koch, J. et al., TCCC Proposed Change 25-2 — Tourniquet Reassessment Protocol. Journal of Special Operations Medicine, March 2026
American Red Cross, “How to Apply a Tourniquet,” redcross.org, November 2024
Harcke, H.T. et al. (2019): Journal of Trauma and Acute Care Surgery — 20% of trauma deaths potentially preventable with immediate bleeding control
Disclaimer: This article is for educational purposes only. In a medical emergency, call emergency services immediately. Tourniquet removal should only be performed by trained medical personnel. This content does not constitute medical advice.


